How to export manifest CSVs and create Review Batches from the Analyst Home Page
The Analyst Home Page has changed. See this article for information about how the new interface works.
On the Analyst Home Page, once you have chosen your target Business Unit, score category and scoped the view of the Hotspot List you are ready to create an export manifest or add to a Review Batch.
Example: How to Perform an Action on a Hotspot List

- Select your target Business Unit.
- Select the score category of interest.
- Scope the view to a Repository Type or Geolocation, or set the scope to All Repositories/All Locations.
- Select the Actions button.
The options in the Actions list changes depending on the Hotspot type (Containers or Objects) and whether you have selected any items in the list.
| Action | Description |
| Filters |
See below for details on filtering Hotspot Lists. |
| Export Selected Containers |
This command creates a CSV manifest of the selected Containers. The manifest includes the following details for each Container: Path, Name, ResourceCount, FeatureExtractionCount, WithScoreCount, Date Created Utc, Date Modified Utc, Date Last Accessed Utc, Last Updated Utc, Resource Total Size, Resource Min Size, Resource Max Size, Resource Mean Size, Resource Created/Modified/LastAccessed/ dates (oldest, newest and mean), Score Name, Business Unit, Host, Geo Location, Repository Type |
| Export Selected Container Objects |
This command creates a CSV manifest of the Objects in the selected Containers. The manifest includes the following details for each Object: Path, Container, Name, Extension, Size, Date Created, Date Modified, Date Last Accepted, Resource Type, Score Name, Score, Business Unit, Host, Geo Location, Repository Type. |
| Export Selected |
This command creates a CSV manifest of the selected Objects. The manifest includes the following details for each Object: Path, Container, Name, Extension, Size, Date Created, Date Modified, Date Last Accepted, Resource Type, Score Name, Score, Business Unit, Host, Geo Location, Repository Type. |
| Add to a New Batch |
Add the selected Containers to a new Review Batch. |
| Add Selected to Review | Adds the selected Containers to a Review Batch. |
| Remove Selected from Review | Removes the selected Containers from a Review Batch. |
NOTE: Exports are limited to 50,000 entries.
Date Filter
Both Profile and Analyst Hotspots allow you to filter the list by Date. Under the Actions menu, choose the Set command for the date filter option. This will open a dialog box that allows you to choose an Age Category or define a Custom Date Range. Age Categories are defined by an ActiveNav Cloud Administrator. See Creating Date Ranges for more details.


There are two types of Custom Date Ranges: automatic and user defined. The automatic date ranges are calculated at the moment you set the filter. Today means the current date. Last month means the last whole calendar month. Last year means the last calendar year. There are three user defined date ranges. After means any time on or after a user chosen date up to the current date. Before means any time on or before a user chosen date. Between means any time between (and including) the user chosen dates.
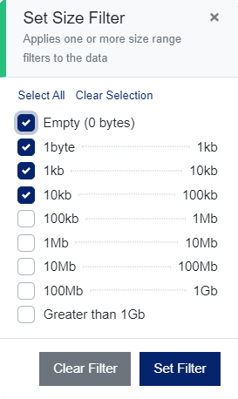
Size Filter
Both Container and Object Profile Hotspot Lists can be filtered by size. Clicking the Set command for the size filter will open a dialog box that allows you to choose which size ranges you want to include in the Hotspot List.
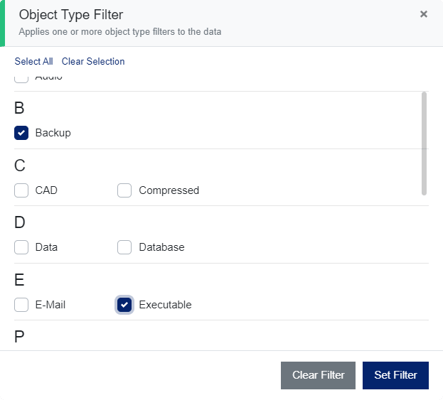
Object Type Filter
Only the Object Profile Hotspot List allows you to filter by Object Type. Clicking the Set command for the object type filter will open a dialog box that allows you to choose which object types you want to include in the Hotspot List.